LLM Integration
The LLM integration exposes built-in and custom HTTPS model providers to
attached VMs through an exe.dev integration hostname. New accounts get a
default llm integration attached to auto:all, so VMs can call
https://llm.int.exe.xyz/v1/models without storing provider API keys on the
VM.
Choose one source for each provider:
exe.dev LLM gateway: use exe.dev managed credentials and your exe.dev LLM allocation.API Key: store your provider API key in the integration. The VM can call the integration hostname, but cannot read the key.ChatGPT subscription: connect a ChatGPT account and use it as the OpenAI source for a personal LLM integration. This is not an OpenAI Platform API key.Custom HTTPS endpoint: route supported LLM APIs to another HTTPS provider, with optional bearer-token or custom-header authentication.Disabled: hide that provider from the integration.
ChatGPT subscriptions are only available for the OpenAI provider, and only on personal LLM integrations. Team LLM integrations can use the exe.dev gateway or provider API keys.
Configure in the browser
Open the Integrations page and click LLM.
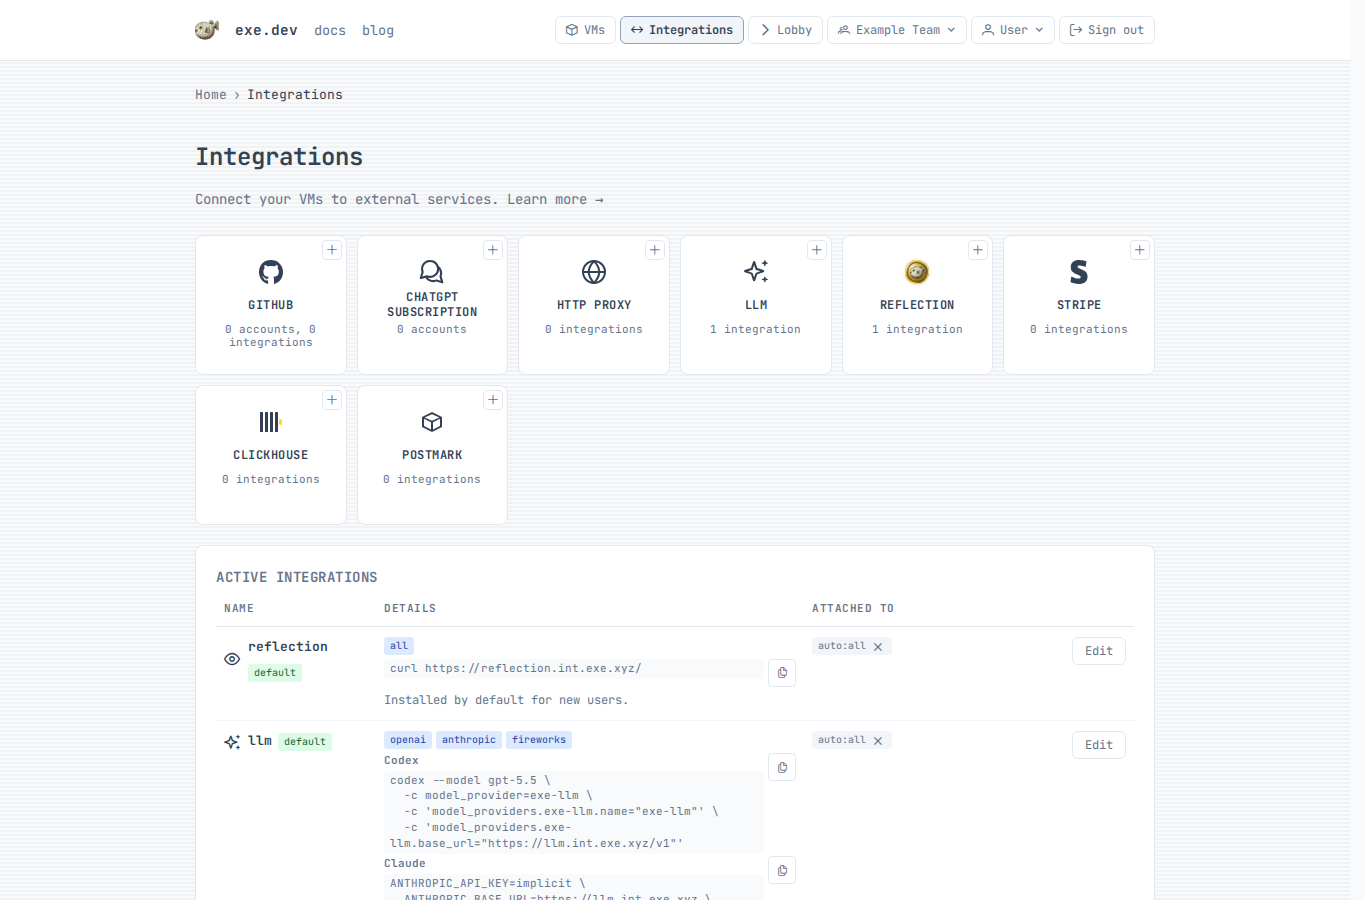
Add an LLM integration
- Choose an integration name. The default name
llmgives attached VMs the hostnamellm.int.exe.xyz. - For each provider, choose
exe.dev LLM gateway,API Key,ChatGPT subscription, orDisabled. - If you choose
ChatGPT subscriptionfor OpenAI, connect a ChatGPT account first, then select the connected account by name. - If you choose
API Key, paste the provider key and optionally clickTest. - To add a custom provider, choose
Add provider→Custom HTTPS endpoint, then enter a unique provider ID, HTTPS base URL, supported APIs, and authentication. Model discovery filters are optional. - Choose where to apply the integration: a VM, a tag, or
auto:all. - Click
Add integration.
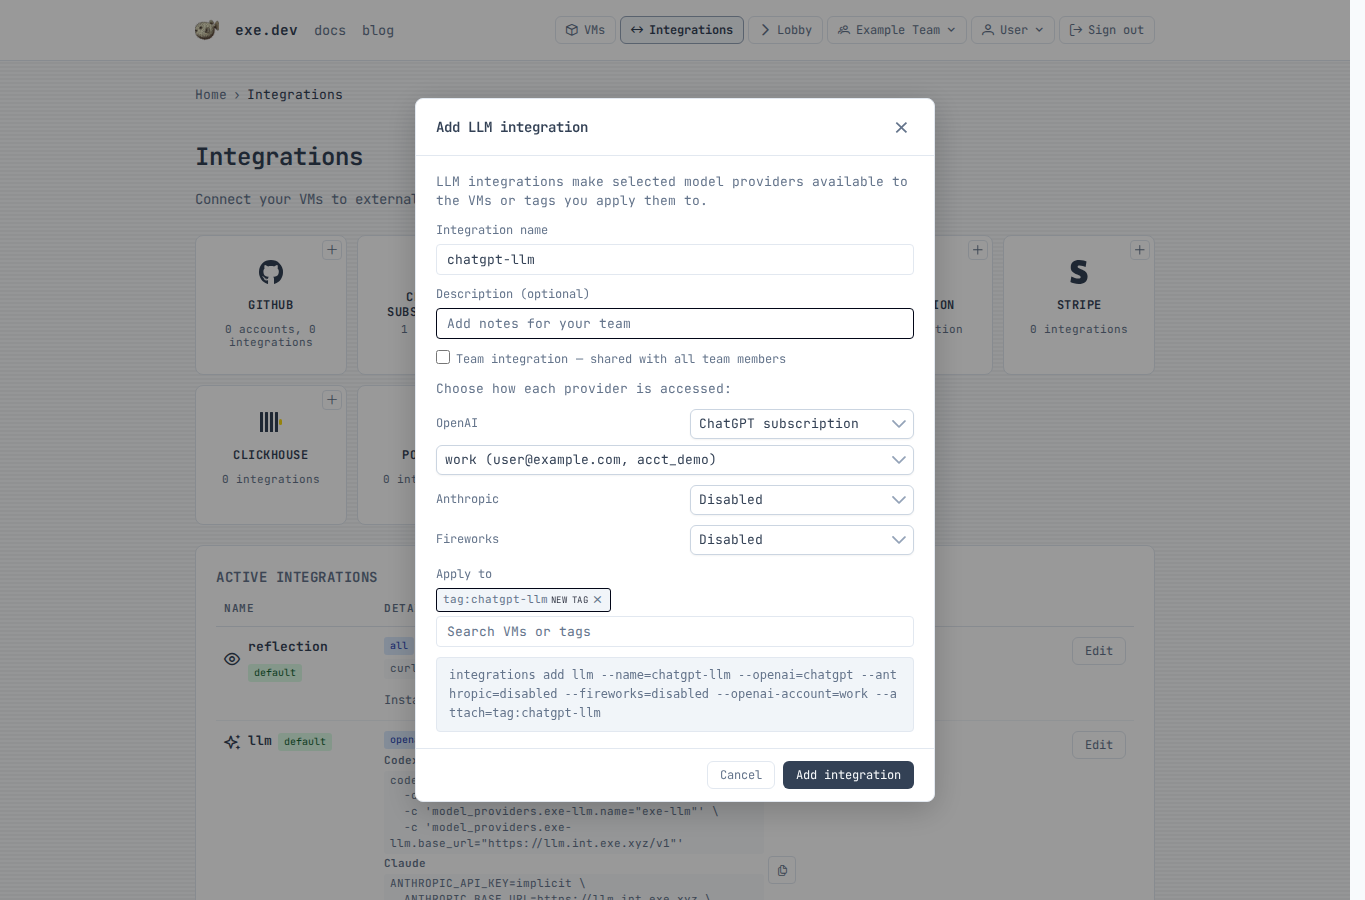
The integration hostname is available from any attached VM after the integration is saved.
Connect a ChatGPT account
Connect a ChatGPT account only if you want the OpenAI provider to use a ChatGPT subscription instead of the exe.dev LLM gateway or an OpenAI API key.
Enable device code login in ChatGPT
ChatGPT subscription integrations use ChatGPT's device-code authorization flow. Before connecting an account in exe.dev, make sure device code login is enabled on the ChatGPT side.
Enable device code login in your ChatGPT security settings (personal account) or ChatGPT workspace permissions (workspace admin).
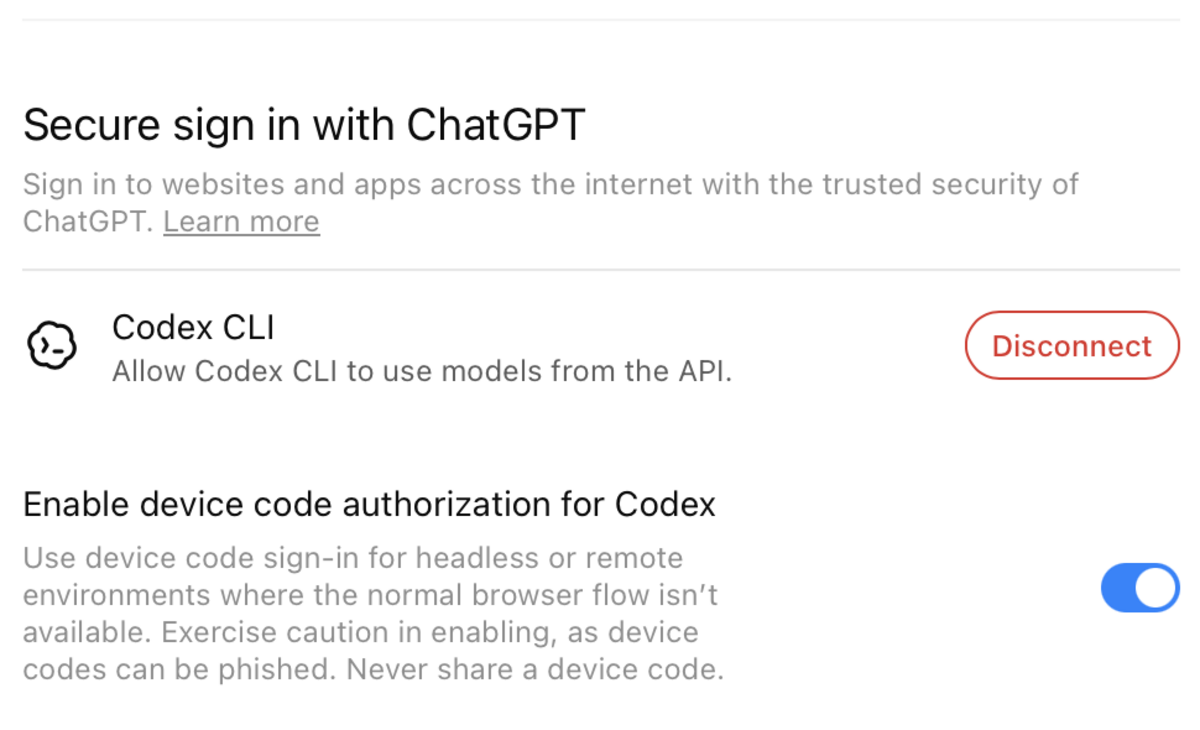
If this setting is disabled, exe.dev can still show a one-time code, but ChatGPT may reject the authorization before the account is connected.
- Confirm device code login is enabled in ChatGPT.
- Click
ChatGPT subscription. - Enter a short local account name, such as
work. - Click
Connect account. - Click
Open ChatGPT, sign in, and enter the one-time code. - Return to exe.dev and click
Done signing in.
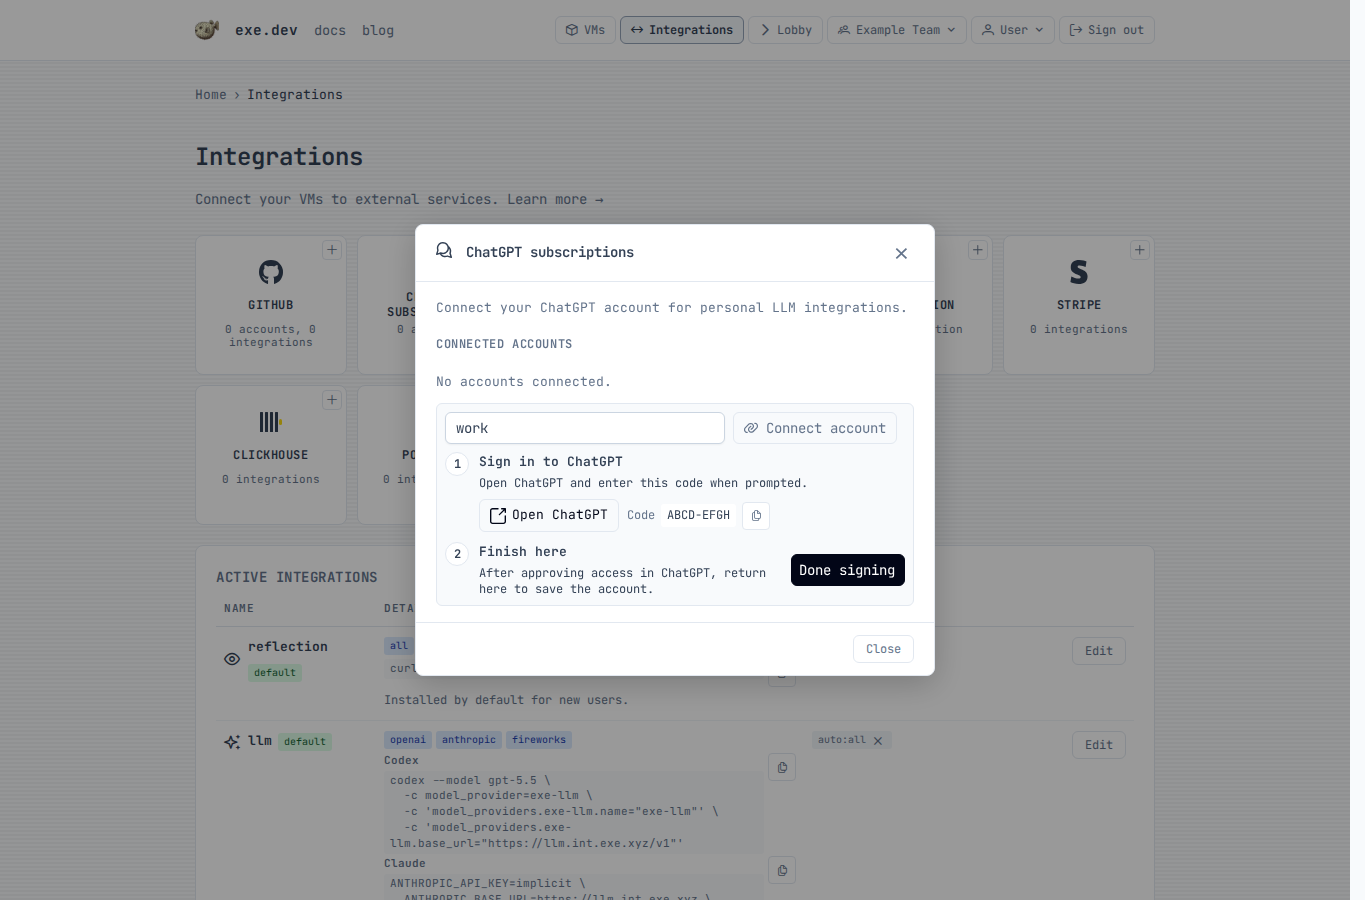
The saved account can now be selected by LLM integrations. You can connect more than one ChatGPT account and choose the account by name.
Configure over SSH
Reinstall the default managed LLM integration:
exe.dev ▶ integrations add llm --name llm --attach auto:all
Create a bring-your-own-key integration. From your local shell, use - to
read provider keys from stdin
(see Providing secrets):
$ printf '%s' "$OPENAI_API_KEY" | ssh exe.dev integrations add llm --name openai-key --openai=byok --openai-key=- --anthropic=disabled --fireworks=disabled --attach tag:llm
Multiple keys can be supplied together, one per line in the same order as the corresponding flags:
$ printf '%s\n%s\n' "$OPENAI_API_KEY" "$ANTHROPIC_API_KEY" | \
    ssh exe.dev integrations add llm --name team-keys --openai=byok --openai-key=- --anthropic=byok --anthropic-key=-
Add a custom HTTPS provider. --custom-provider-api can be repeated; omit it
to enable all supported APIs. Use --header instead of --bearer when the
provider needs custom authentication headers.
$ printf '%s' "$CUSTOM_LLM_TOKEN" | \
    ssh exe.dev integrations add llm --name custom-llm \
      --custom-provider=acme=https://api.acme.example/v1 \
      --custom-provider-api=openai_responses --bearer=- --attach tag:llm
Edit an existing integration:
$ printf '%s' "$ANTHROPIC_API_KEY" | ssh exe.dev integrations edit llm --anthropic=byok --anthropic-key=-
exe.dev ▶ integrations edit llm --openai=disabled
To use a ChatGPT subscription for OpenAI, connect a ChatGPT account with the device-code flow. Device code login must already be enabled in ChatGPT before this flow can complete. Enable device code login in your ChatGPT security settings (personal account) or ChatGPT workspace permissions (workspace admin).
exe.dev ▶ integrations setup chatgpt --name work
Open this URL to authorize ChatGPT:
  https://chatgpt.com/...

Enter this code:
  ABCD-EFGH

Waiting for authorization...
After the account is connected, create a personal LLM integration that uses it for OpenAI:
exe.dev ▶ integrations add llm --name chatgpt-llm --openai=chatgpt --openai-account=work --anthropic=disabled --fireworks=disabled --attach auto:all
List, verify, or disconnect ChatGPT accounts:
exe.dev ▶ integrations setup chatgpt --list
exe.dev ▶ integrations setup chatgpt --verify
exe.dev ▶ integrations setup chatgpt --name work --delete
Use from a VM
Attached personal integrations are available at
https://<integration-name>.int.exe.xyz. Team integrations use
https://<integration-name>.team.exe.xyz.
List available models:
$ curl https://llm.int.exe.xyz/v1/models
Call the OpenAI Responses API:
$ curl https://llm.int.exe.xyz/v1/responses \
    -H "content-type: application/json" \
    -d '{
      "model": "gpt-5.5",
      "input": "Say hello from exe.dev."
    }'
Call the Anthropic Messages API:
$ curl https://llm.int.exe.xyz/v1/messages \
    -H "content-type: application/json" \
    -H "anthropic-version: 2023-06-01" \
    -d '{
      "model": "claude-sonnet-4-6",
      "max_tokens": 256,
      "messages": [{"role": "user", "content": "Hello!"}]
    }'
Transcribe an audio file (up to 25 MB; billed per minute of audio):
$ curl https://llm.int.exe.xyz/v1/audio/transcriptions \
    -F model=gpt-transcribe \
    -F file=@recording.m4a
For Whisper word-level timestamps, request its verbose JSON format:
$ curl https://llm.int.exe.xyz/v1/audio/transcriptions \
    -F model=whisper-1 \
    -F response_format=verbose_json \
    -F 'timestamp_granularities[]=word' \
    -F file=@recording.m4a
Use timestamp_granularities[]=segment for segment timestamps, or repeat the
field with both values to receive both. Managed Whisper requests require
response_format=verbose_json; its plain JSON response does not include the
usage data the gateway needs for billing. Other transcription models use
response_format=json. Bare text, srt, and vtt responses and
stream=true are rejected for managed requests. Transcription requires
managed OpenAI or BYOK; a ChatGPT subscription does not provide it. To keep
ChatGPT for chat, attach a separate LLM integration with managed OpenAI or BYOK
and send transcription requests to that integration's hostname.
The generic /v1 endpoints route by model ID. To force a provider, prefix the
path with /openai, /anthropic, or /fireworks/inference; for example:
https://llm.int.exe.xyz/openai/v1/models.
Deepgram transcription
Enable Deepgram in the integration's provider settings, or use
integrations edit llm --deepgram=managed over SSH. For your own API key, use
integrations edit llm --deepgram=byok --deepgram-key=- and enter the key when prompted.
curl --fail-with-body 'https://llm.int.exe.xyz/deepgram/v1/listen?model=nova-3&smart_format=true' \
  -H 'Content-Type: application/octet-stream' \
  --data-binary @recording.m4a
The transcript is at results.channels[0].alternatives[0].transcript.
Uploads are limited to 26 MiB; split larger recordings or submit
{"url":"https://example.com/recording.m4a"} with Content-Type: application/json.
As of Sep 2026, Nova-3 recorded audio costs $0.0043/minute per transcribed channel,
or $0.0052 with language=multi.
Duration includes fractional seconds.
See Deepgram pricing for the latest.
Managed requests use your exe.dev credits; BYOK requests are billed by Deepgram.
Both modes set mip_opt_out=true.
Managed options: model, language, smart_format, punctuate,
paragraphs, utterances, utt_split, diarize, multichannel, numerals,
profanity_filter, filler_words, encoding, sample_rate, and channels.
Managed requests require a known language code or language=multi and reject
automatic language detection and paid add-ons. BYOK supports discovered
recorded-audio models and their native options. Both modes reject callbacks,
live transcription, text-to-speech, and other Deepgram endpoints.
Use with Shelley
Shelley automatically discovers attached LLM integrations through the
reflection integration. On new accounts, the default reflection
integration is attached to auto:all, so Shelley can see the default llm
integration and show its models in the Model: picker without custom model
setup or API keys in the VM.
If the model list changes while Shelley is open, choose Add / Remove Models... from the Model: picker and click Refresh. Use Add Model only
for separate custom model providers.
If Shelley does not show the integration models, reinstall Reflection with the attached integrations field exposed:
exe.dev ▶ integrations add reflection --name reflection --fields all --attach auto:all
If you use a different LLM integration name, attach that integration to the VM,
a tag, or auto:all. Shelley discovers every attached integration of type
llm.
Use with Codex
When the OpenAI provider is enabled, run Codex inside an attached VM with the integration as its model provider:
$ codex --model gpt-5.5 \
    -c model_provider=exe-llm \
    -c 'model_providers.exe-llm.name="exe-llm"' \
    -c 'model_providers.exe-llm.base_url="https://llm.int.exe.xyz/v1"'
Or add a provider to ~/.codex/config.toml:
model_provider = "exe-llm"

[model_providers.exe-llm]
name = "exe-llm"
base_url = "https://llm.int.exe.xyz/v1"
requires_openai_auth = false
If your LLM integration uses --openai=chatgpt, the ChatGPT account is
connected to exe.dev, not to the VM. Codex still talks to the integration
hostname without an OpenAI API key in the VM.
Use with Claude Code
When the Anthropic provider is enabled, Claude Code expects an API key value, so provide a harmless placeholder and point it at the integration hostname:
$ ANTHROPIC_API_KEY=implicit \
    ANTHROPIC_BASE_URL=https://llm.int.exe.xyz \
    claude --model opus
Or add the configuration to ~/.claude/settings.json:
{
  "apiKeyHelper": "printf exe-gateway",
  "env": {
    "ANTHROPIC_BASE_URL": "https://llm.int.exe.xyz"
  }
}
If you use a different integration name, replace llm in the hostname with
that name.
Attachments
The default llm integration is attached to auto:all. If you create a
separate integration, attach it to a VM, a tag, or all VMs:
exe.dev ▶ integrations attach chatgpt-llm vm:devbox
exe.dev ▶ integrations attach chatgpt-llm tag:llm
exe.dev ▶ integrations attach chatgpt-llm auto:all
See Attaching Integrations for more attachment examples.